Difference between revisions of "Article Tutorials/Drawing Bitmaps"
m (formatting) |
(update?) |
||
| Line 1: | Line 1: | ||
== Displaying Images == | == Displaying Images == | ||
| + | First we need to add images to our project: | ||
| − | + | Right-click '''Files''' and select Link existing files from the menu: | |
| − | + | [[File:Images-Add-Existing-Files.png]] | |
| − | [[File:Images-Add-Existing-Files.png | ||
| − | Add in an image you’ve created or downloaded from the internet | + | Add in an image you’ve created or downloaded from the internet: |
| − | [[File:Add-Yin-Yang.png | + | |
| + | [[File:Add-Yin-Yang.png]] | ||
You can copy my yinyang image from here: | You can copy my yinyang image from here: | ||
| − | |||
| − | Now | + | [[File:Yinyang.png]] |
| + | |||
| + | Now we can display this image on the screen. | ||
| + | |||
| + | In your main.lua: | ||
<source lang="lua"> | <source lang="lua"> | ||
local yinyang = Bitmap.new(Texture.new("yinyang.png")) | local yinyang = Bitmap.new(Texture.new("yinyang.png")) | ||
| Line 20: | Line 24: | ||
</source> | </source> | ||
| − | Launch the Player and press the Play button | + | Launch the Player and press the Play button to see the result: |
| − | |||
| − | + | [[File:Yinyang-Player.png]] | |
You can also use SetPosition:<br> | You can also use SetPosition:<br> | ||
| Line 35: | Line 38: | ||
''yingyang:setScaleY(-1)'' | ''yingyang:setScaleY(-1)'' | ||
| − | Change your | + | Change your image rotation angle:<br> |
''yinyang:setRotation(45)'' | ''yinyang:setRotation(45)'' | ||
| − | Fade your image. This sets | + | Fade your image. This sets its transparency:<br> |
| − | ''yinyang:setAlpha(0.5)'' | + | ''yinyang:setAlpha(0.5)'' '''Alpha can be anywhere from 0 to 1''' |
| − | |||
| − | Alpha can be anywhere from 0 to 1 | ||
| − | |||
You can also make your image totally disappear without removing it from the stage:<br> | You can also make your image totally disappear without removing it from the stage:<br> | ||
''yinyang:setVisible('' ''' ''false'' ''' '')'' | ''yinyang:setVisible('' ''' ''false'' ''' '')'' | ||
| − | |||
When you’re finished with your image, don’t forget to remove it from the stage so it won’t take up memory and processor:<br> | When you’re finished with your image, don’t forget to remove it from the stage so it won’t take up memory and processor:<br> | ||
| Line 54: | Line 53: | ||
''yinyang ='' '''nil''' | ''yinyang ='' '''nil''' | ||
| − | + | == Sprite Group == | |
| − | You can add a few images to a Sprite group object | + | You can add a few images to a Sprite group object, then all transformation done on the group will propagate to its children: |
<source lang="lua"> | <source lang="lua"> | ||
spritegroup = Sprite.new() | spritegroup = Sprite.new() | ||
| Line 75: | Line 74: | ||
| − | + | '''Note''': this tutorial was written by [http://bluebilby.com/author/waulokadmin/ Jason Oakley] and was originally available at: http://bluebilby.com/2013/04/14/gideros-mobile-tutorial-displaying-images. | |
| − | '''Note | ||
Revision as of 20:36, 10 May 2020
Displaying Images
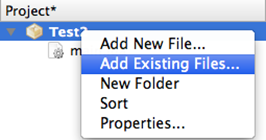
First we need to add images to our project:
Right-click Files and select Link existing files from the menu:
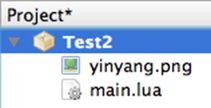
Add in an image you’ve created or downloaded from the internet:
You can copy my yinyang image from here:
Now we can display this image on the screen.
In your main.lua:
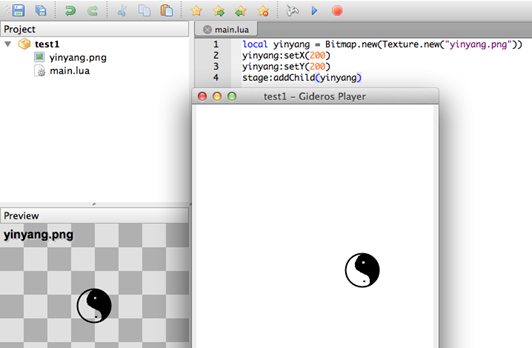
local yinyang = Bitmap.new(Texture.new("yinyang.png"))
yinyang:setX(200)
yinyang:setY(200)
stage:addChild(yinyang)
Launch the Player and press the Play button to see the result:
You can also use SetPosition:
yinyang:setPosition(210, 220)
Now set the size (scale) of the image. X-scale to ½ the width and Y-scale to twice the height:
yingyang:setScale(0.5, 2)
You can flip your image horizontally or vertically in code to save creating separate images for each direction:
yingyang:setScaleX(-1)
yingyang:setScaleY(-1)
Change your image rotation angle:
yinyang:setRotation(45)
Fade your image. This sets its transparency:
yinyang:setAlpha(0.5) Alpha can be anywhere from 0 to 1
You can also make your image totally disappear without removing it from the stage:
yinyang:setVisible( false )
When you’re finished with your image, don’t forget to remove it from the stage so it won’t take up memory and processor:
stage:removeChild(yinyang)
Remove your image from memory totally:
yinyang = nil
Sprite Group
You can add a few images to a Sprite group object, then all transformation done on the group will propagate to its children:
spritegroup = Sprite.new()
spritegroup:setPosition(100,100)
local yinyang = Bitmap.new(Texture.new("yinyang.png"))
yinyang:setPosition(10,10)
spritegroup:addChild(yinyang)
local yinyang2 = Bitmap.new(Texture.new("yinyang.png"))
yinyang2:setPosition(100,100)
spritegroup:addChild(yinyang2)
stage:addChild(spritegroup)
Set all images in the Sprite group to half transparency:
spritegroup:setAlpha(0.5)
Rotate the Sprite group to rotate all images:
spritegroup:setRotation(45)
Note: this tutorial was written by Jason Oakley and was originally available at: http://bluebilby.com/2013/04/14/gideros-mobile-tutorial-displaying-images.


